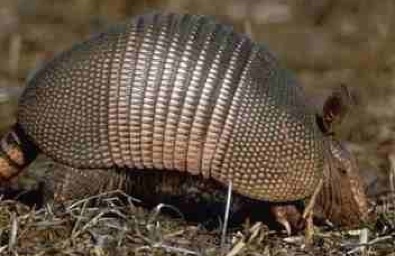
Armadillos have horrible eyesight
Armadillo Cuisine: Cooking a Hoover Hog
Armadillos are an overlooked food animal, not protected by law, available throughout the year, and good tasting. And they have been expanding their range, with some found as far north as northern Missouri and Oregon. There’s an armadillo near you.
That said let’s take care of a persistent rumor. A 2008 study almost put to rest the belief that you can get leprosy from eating armadillo. Of some 2500 armadillos caught and tested in Florida, none had leprosy. And for many years researchers were hard pressed to find someone in the United States with leprosy who had actually been in physical contact with armadillos in the United States. This changed in 2015 with several cases reported in Florida, some involving contact. However means of transmission are vague and 95% of people are resistant to leprosy. For years the position has been there is no correlation between hunting armadillos, cleaning them or eating them and having leprosy. In fact traveling to Mexico increased your chances of leprosy more than Armadillos did. Armadillos can occasionally have leprosy — the only other mammal that can get it — but thorough cooking would take care of the problem if it occurred. So there is a bit of a mystery and a bit of risk. The solution, if one is going to eat armadillo, is to take precautions cleaning said and cooking thoroughly.
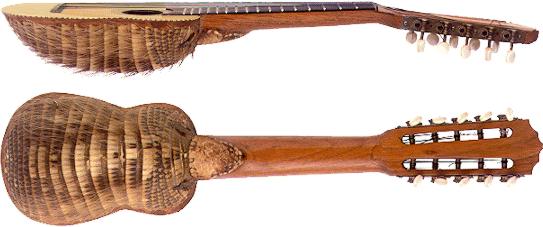
Charango, a ukulele-like instrument is tradtionally made fro an armadillo shell.
Armadillos eat the little invertebrates that live just under the leaf litter of shady forests. On their list of favorites are earth worms, grubs, beetle larvae, mole crickets, army worms, termites, yellow jackets, cockroaches, wasps, flies, grasshoppers, ant larvae and, for some reason, they also love egg shells. They have 40 peg-like teeth in the back of the mouth — read they can’t bite you — and pig-like snout digging out wiggly delectables. Stay away from their claws, however. Those can hurt. It’s been estimated that one armadillo can eat up to 40,000 ants in one meal. That’s four pounds of bugs a week, or 200 pounds each year. The entire population of North American armadillos is estimated to eat more than six billion pounds of insects per year. They’re good to have around.
There are 20 species of armadillos, including the three, six, and nine-banded armadillos. They’re named for the number of bands in their armor. The nine-banded armadillo (which has six species) is the only one to range into the United States. The nine-banded armadillos were first reported in the United States in 1849 (not 1949 as some copycat sites say.) John James Audubon, who was known more in his day as a hunter than a naturalist, noted them in Texas in 1854. For more on Audubon, see Geiger Tree.
The nine-banded armadillo mates — missionary style — as early as July and as late as December and gives birth during the months of March and April, when not stressed or when climate conditions are at there best. They give birth to four identical young, quadruplets of the same sex . Full size they weight 8 to 17 pounds. Armadillos are prolific and there is an estimated 50 million of them in the United States. Fire up the barbie! The Nine-banded Armadillo is also the most numerous armadillo. They’re known by a variety of local names. Armado in Guatemala and Panama. Cachicamo in Venezuela, Carachupa in Peru, Cusuco in Costa Rica, Kapasi in Suriname, , in Argentina, and Tatu Galinha in Brazil.

What their scientific name, Dasypus novemcinctus ( DAS-ih-puhs noh-VEM-sink-tuhs) means is a bit of a nonsensical dispute. Dasypus novemcinctus literally means “hairy foot nine girdle.” That’s the interpretation if one thinks “Dasypus” is two Greek words put together meaning hairy foot. Dasis does mean hairy or bushy. Pous is a common term for foot. The other view is that it came from an Ancient Greek word for rabbit “dasypodis.” I suspect both are right, that dasypodis meant rabbit and also hairy foot. More to the point, the Aztecs called the the armadillo Azotochtli, or “turtle rabbit.” so when it was being named by Carl Linnaeus there was an effort to keep “rabbit” in the reference. More so, without their shell the armadillo resembles a rabbit but tastes more like fine-grained, high-quality pork.
The US population of armadillos had its start in two places. First it moved into Texas from Mexico and about a century later crossed the Mississippi. At the same time, armadillos became roadside attractions in Florida. Their unintentional liberation started a Florida group. Around the 1970s the separate populations met and merged in the Florida panhandle. Generally said armadillos are most abundant within 100 miles of the Atlantic or Gulf of Mexico but are found throughout the South north to Nebraska and Missouri.
Florida Crackers have been enjoying fried armadillo for more than 100 years. The easy-to-catch animals provided meat for many a pioneer household. They got the nicknames “possum on the half-shell” and later during the Great Depression they were called “Hoover Hogs.” At the time President Hoover was promising a “chicken in every pot” but people were so poor all they could eat was what they could catch, including armadillo. Many people parboil the meat and trim off all fat, which gets rid of any wild game taste. Then they fry it but that is not necessary. It can be used as is in stews and the like.
Armadillos typically rest in a deep burrow during the day and become more active during the late evening, night, or early morning. These burrows are usually located under brush piles, stumps, rock piles, dense brush, or concrete patios, and are about 7-8 inches in diameter and can be up to 15 feet long. There are several live-trapping techniques that can be used to capture armadillos when they come out of their burrows. One is to firmly insert a 6-inch diameter PVC pipe into the entrance of an active burrow. Regular-sized armadillos will get stuck in the pipe as they try to exit. A nylon throw-net used for fishing can also be staked down so it covers the burrow entrance. Armadillos will get tangled in the net as they emerge. Another trapping technique involves burying a large bucket (larger than five gallons) in front of the entrance, and covering it with newspaper or plastic sheeting and a light layer of soil. Their eyesight is so poor they fall into it.
Armadillos can also be trapped in raccoon-sized, metal, cage live traps or in homemade box traps. Traps should be located near the entrance of burrows or along fences or other barriers where they might travel. This trap is most effective when “wings” (1 x 6 inch x 6 feet boards or other material) are added to funnel the animal into the trap. Suggested baits are live earthworms or mealworms placed in hanging bags made of old nylon stockings. Other suggested baits are overripe or spoiled fruit. Armadillos are more likely to enter a cage trap when leaf litter or soil is placed over the bottom. Because armadillos are nocturnal, all trapping techniques designed to capture armadillos emerging from burrows should be applied late in the afternoon and checked several hours after darkness.
Besides poor eyesight Armadillos also have poor hearing. They do however, have a keen sense of smell, so get thee downwind. They like dense shady cover, such as brush, woodland or pine forests. The texture of the soil is also important. They prefer sandy or loam soils that are relatively easy to rummage through. Compared to other common mammals such as raccoon and opossum, armadillos are remarkably free of parasites. Rabies has never been diagnosed in armadillos in Florida.
Armadillos are one of the most common victims of highway mortality in Florida. The armadillo’s instinctive response of jumping upwards three or four feet when startled may be effective at avoiding a lunging predator, but not an automobile or truck passing overhead. As long as there are highways it makes one wonder if that trait will be bred out.
Shooting is another method frequently used to control or obtain armadillos. Recommended firearms are a shotgun with No. 4 to BB-sized shot or .22 or other small caliber rifle. It is illegal in most places to use artificial lights to aid in the shooting of armadillos at night.
You should skin and dress an armadillo as soon as possible. The easiest method is to skin from the underside to split the skin from the neck most the way down to the tail, best be careful not to puncture the abdominal cavity. You’ll need a sharp knife. Peel the animal out as you would a squirrel or rabbit. Remove all fat from under the front and back legs and wash meat thoroughly. After meat is cleaned completely, cut into quarters. It is recommended you wear gloves and a mask while cleaning the animal. It is estimated 15 to 20% of armadillos carry the leprosy bacteria. The disease can take years to manifest itself, first symptoms is usually a skin rash. Some cases of leprosy have been misdiagnosed as Lyme’s disease. The antibiotics used to treat Lyme Disease does not affect Leprosy bacteria.
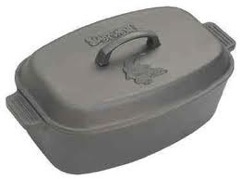
In some South American countries they cook the armadillo in the shell on the grill (after gutting it) split side down. It is then eaten out of the shell. One can do the same thing near an open camp fire getting rid of the need for pots or pans.
On You Tube my video #70 at the end shows how close one can get to an armadillo.
*A large statistical analysis infers some Armadillos must of had leprosy but an actual animal with it is difficult to find in U.S. And people in the United States who get leprosy usually have in connection with travel and armadillos in Mexico. That said contact with Armadillos in central Florida are increasing.
BAKED ARMADILLO
1 armadillo (or more), removed from shell (reserve to make a musical instrument.)
Salt
Pepper
Chunks of apple & pineapple (about 1 1/2 c. each)
1/2 c. butter
An armadillo produces a lot of meat. The smaller ones are best for frying; the older ones need to be cooked slowly for a long time to ensure tenderness. After cutting carcass out of the shell, thoroughly wash meat. Salt and pepper armadillo. Stuff with chunks of apple and pineapple. Coat with butter and wrap in foil and place in roasting pan. Bake in a 325 degree oven until internal temperature reaches 180 degrees. Allow 30-45 minutes per pound. Allow 1/3 pound of meat per serving.
ARMADILLO FRICASSEE
1 armadillo, cut into pieces
2 med. potatoes
2 onions, sliced
2 carrots, coin chopped
1 stalk celery, chopped
1 bay leaf
1/4 tsp. thyme
1/2 c. butter
1/2 c. flour
1/2 tsp. salt
1/4 tsp. pepper
Dust armadillo meat in flour, salt, and pepper. Brown on both sides in the butter. Put enough water in pot to cover after adding remaining vegetables. Cover and simmer until meat is tender, about 2 hours. Add seasoned flour and water to thicken liquid.
Armadillo Chili
3 1/2 to 4 lbs. armadillo cut into 1/4 inch cubes
2 c. diced onion
3 cloves garlic, minced
1/2 tsp. black pepper
1/4 c. vegetable oil
28 oz. crushed tomatoes
1 3/4 c. water or beer
1 dried milk red chili pod
1/2 tsp. oregano
1 tbsp. liquid smoke and/or 2 tsp. masa harina (optional)
2 med. green bell peppers, diced
2 tsp. salt
1 tbsp. sugar
28 oz. can tomatoes
12 oz. tomato paste
1 tsp. ground cumin
Cut and remove stem and most of the seeds from chili pod. Tear pod up into small pieces. Then place in heavy pan and toast over medium low heat till crisp. Let cool. Crumble or crush into powder. Put oil in 5 quart or larger heavy pan, heat to medium high, add meat 1/3 at a time and brown. Remove meat as it browns Stir onions, peppers, garlic and powdered chili into hot oil. Continue cooking and stirring until tender. Add remaining ingredients, stir. Return browned meat to pan, continue stirring until mixture begins to boil. Reduce heat to low. Cover and simmer 1 hour. Stir often or till meat is tender. Pour into serving bowls, add hot chili sauce or hot salsa to suit taste. Garnish with shredded Monterey Jack or cheddar cheese and chopped onion. Note: May substitute chili pod. ground cumin and oregano with 4 teaspoons commercially prepared chili powder. May add more water and/or tomato sauce while preparing, if you prefer soupier.
FRIED ARMADILLO
Place serving size pieces in a stew pot with a little water and gently boil until meat is tender, about 1/2 hour. Remove meat and cool; roll in flour with salt and pepper. Put in skillet of hot cooking oil. Brown on both sides. Cover skillet and cook 20 to 30 minutes. Add chicken broth, if needed.
ARMADILLO AND ONIONS
1 armadillo
11/2 tsp. salt
1/4 tsp. paprika
1/2 c. flour
3 tbsp. fat
3 lg. onions, sliced
1 c. sour cream
Soak meat overnight in salted water (1 tablespoon salt to 1 quart water). Drain, disjoint and cut up. Season with 1 teaspoon salt, paprika, roll into flour and fry in fat until browned. Cover meat with onion, sprinkle onions with 1/2 teaspoon salt. Pour in the cream. Cover skillet tightly and simmer for 1 hour.
ARMADILLO MEATLOAF
11/2 lbs. ground meat
2 eggs, beaten
1/8 c. dry crumbs
1 c. evaporated milk
1/4 onion, minced or grated
1/4 tsp. thyme
1 tsp. salt
1/4 tsp. pepper
1 tsp. Worcestershire sauce
Soak meat overnight in salted water (1 tablespoon salt to 1 quart water). Remove meat from bones and grind. Mix thoroughly with other ingredients. Place in meat loaf dish. Place dish in pan containing hot water. Bake in a moderate oven, 350 degrees for 11/4 hours to 2 hours.
MARINADE MEAT SAUCE Combine all marinade ingredients, stirring well. Prepare armadillo meat by cleaning and cutting into serving pieces. Marinate for 24 hours. Remove from solution and allow to drain for 30 minutes before cooking. In a heavy black iron pot, brown sausage and armadillo in hot oil, permitting meat to stick to bottom of pot just a little for extra flavor. Remove armadillo from pot and set aside leaving sausage in pot. Add onions, green pepper, garlic and celery; stir continuously, cooking until tender. Add steak sauce, pick-a-peppa sauce, salt, pepper, MSG, and Worcestershire sauce; mix well. Add armadillo and water. Heat to boiling; reduce heat and simmer for 10 minutes. Reduce to low heat and cover with tight lid. Cook until tender. (Do not stir but take pot by handle and half-spin from left to right every 10 minutes). Add mushrooms and wine; blend gently with a spoon. Sprinkle with parsley and lay thin lemon slices on top. Simmer uncovered for 15 minutes. Serve over rice.
Sloppy Joes for 50
8 lbs. ground armadillo
1 c. chopped onion
1 c. chopped celery
1 c. chopped, cored & peeled apple
2 qts. tomato sauce
1/2 c. brown sugar
2 tbsp. mustard
1/2 c. vinegar
Brown meat, celery, onion and apples with 1/4 cup vegetable oil. Combine ingredients for sauce and simmer for 15 minutes. Add sauce to meat, onion, celery and apple mixture. Serve with big buns. Plan to make this 1 day before you need it served because it always tastes better as a leftover (this will also allow the opportunity to upgrade your road kill!)